These are the main actions available on the Statements screen:
- Adding Accounts

- Editing Accounts
- Deleting Accounts
- Filtering by Accounts
- Fixing Date Gaps
- Importing in New Statements
- Exporting Accounts and Date Gaps

Adding Accounts 
To create a new Accounts click the Add Account ![]() button.
button.
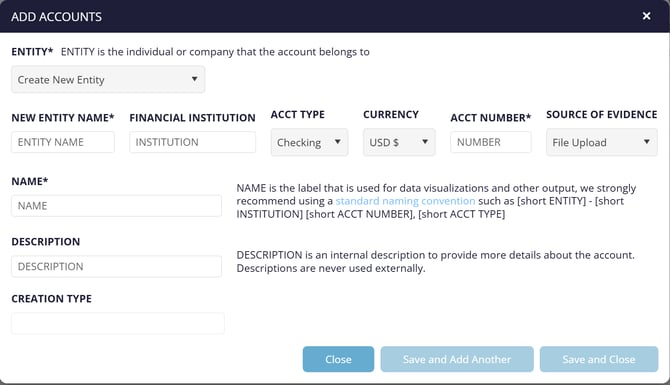
The fields required to setup a new Account are:
- Entity: This is the Entity that the Bank Account belongs to. Either an individual, or a company. Valid8 allows you to setup an Entity structure so that you can load up bank accounts across multiple entities and trace all the transfers between accounts and entities. The first Account that is setup will need a new Entity. This newly created Entity can then be used for subsequent Accounts. Select Create New Entity to create the first Entity. A new field New Entity Name will open up, use this to enter the Entity Name.
- Financial Institution: The owner of the bank account – the financial institution, the bank name or credit union name.
- Acct Type: The type of bank account, options are - Checking (Default), Savings, Credit Card, or Brokerage.
- Currency: The currency of the account, defaults to USD $. This will control what currency symbol shows in front of all transactions for this account.
- Acct Number: The number assigned to the bank account. Recommendation to enter the full account number here for reference purposes.
- Source of Evidence: Defaults to File Upload.
- Name: The name that you assign to this account. This name shows on all the other screens, so make sure that you can distinguish the account from the name. See the recommended naming convention on the screen for help on how to name accounts.
- Description: The description you want to assign to this Account.
-
Creation Type: Defaults to Manual for accounts created within the application. Any account created as part of the Account Extracts Load will have a type of ERP Import.
Account Type can not be changed so make sure you have selected the correct type before saving
Click Save and Close or Save and Add Another if you want to create another account.
New Accounts can be added at any stage in the process. It is quite common for an account to be added after Statements have been processed as this process can identify an account that is not yet created.
Editing Accounts
To edit Account details, click the select box on the account you want to edit and then the edit button. ![]()
Deleting Accounts
To delete Account details, click the select box on the account you want to edit and then the Delete button. ![]() . You can not delete accounts that have statement periods assigned to them.
. You can not delete accounts that have statement periods assigned to them.
Filtering by Accounts
To filter by search for a specific account(s) use the Filter on the grid header. ![]()
This will search against the Entity, Institution, Account Number, Name and Description fields.
Fixing Date Gaps
Clicking the ![]() button will fix statement data gaps of less than 3 days.
button will fix statement data gaps of less than 3 days.
Importing in New Statements
To load new evidence click the Import ![]() button on the far top right of the Accounts grid. This will pop up the Import dialogue that allows you to select from Bank Statements (PDF), Brokerage Statements (PDF), Transaction Lists (CSV), Check Images (PDF) and Check Item Lists (CSV).
button on the far top right of the Accounts grid. This will pop up the Import dialogue that allows you to select from Bank Statements (PDF), Brokerage Statements (PDF), Transaction Lists (CSV), Check Images (PDF) and Check Item Lists (CSV).
Exporting Accounts and Date Gaps
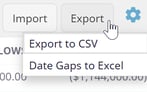
Two exports are available on the Statements page. The Export to CSV will send to your default downloads location a CSV (excel) file with the Accounts listed on this screen. The Date Gaps to Excel option will generate a Date Gap report, which can be downloaded on the Exports screen. Each account is listed showing gaps between statements as well as before and after gaps.